The first genuinely cold stretch of autumn often uncovers issues a home has been quietly hiding. Windows begin to mist over, the heating switches on, and suddenly a faint dark mark appears behind the sofa. When you run your hand along the wall, it feels slightly damp and dusty, carrying that unmistakable, stale cellar smell. Pull back the curtain and the reality is clear: a patch of mould that seems to have emerged overnight, as though the house has been deteriorating unnoticed.
The instinctive response is usually panic. A quick online search leads to frightening warnings about health risks and damaged plaster, followed by one repeated suggestion: use bleach. Yet painters, who work with walls every day, see the situation very differently.
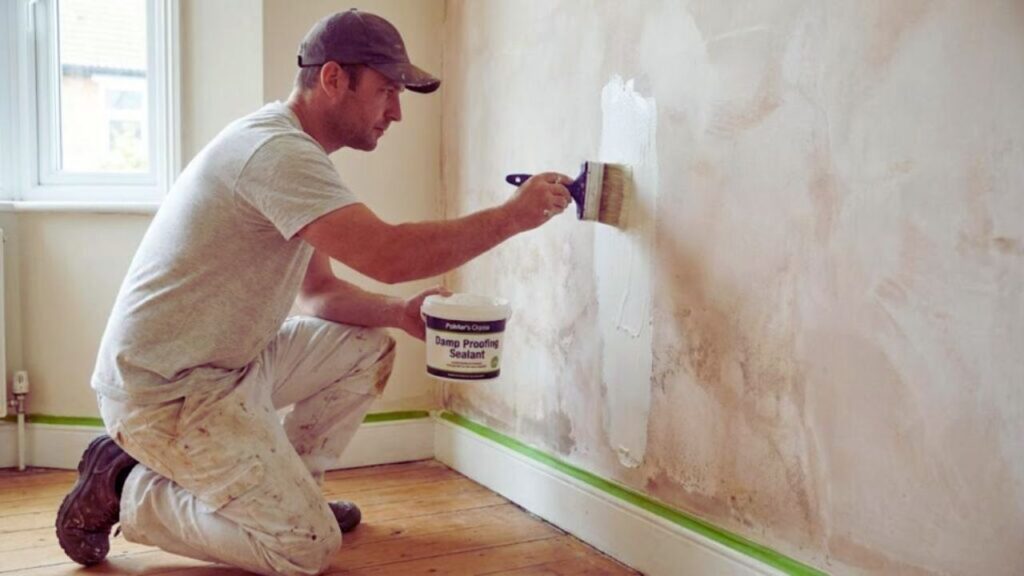
A No-Bleach Method Painters Rely On for Damp Control
Ask an experienced painter how they deal with damp, and bleach or ammonia is rarely their first choice. Instead, they turn to a far simpler setup: a bucket, a sponge, diluted white vinegar, and time. Their attention is not on attacking the dark marks themselves, but on correcting the conditions that allowed them to appear. This careful, patient approach is what separates a quick cosmetic fix from a lasting result.
 8-Second Visual Challenge: Can You Spot the 3 Differences in the Duck Wearing Jacket Image?
Picture a ground-floor rental flat built in the 1970s. The living room faces north, has single-glazed windows, and a radiator sits beneath the sill. Each winter, black spots slowly form in the corners near the window. The tenant scrubs with bleach, cracks the window open briefly, and hopes the problem stays out of sight. By February, the marks return larger than before, paint begins to blister, and the air feels heavy. To the tenant, it looks like dirt. To the painter, it signals something deeper.
The painter notices the cold bridge beneath the window, furniture pushed tightly against the outer wall, and clothes drying indoors. Bleach, he explains, only scorches the surface of mould and can trap moisture beneath a brittle paint layer. Damp is not a stain; it is a symptom.
How Professionals Address Damp the Proper Way
Rather than starting with cleaning, painters focus first on drying the room. Windows are opened fully for 20 to 30 minutes, internal doors are kept open, and heating is used where possible. The aim is to stop the room from “sweating” before touching the wall at all.
Once the space is dry, they prepare a mild solution: warm water mixed with white vinegar at roughly a one-to-three ratio. Using a soft sponge, they gently dab and wipe, lifting mould without damaging the paint. There is no harsh scrubbing. The sponge is rinsed frequently, the water replaced once it turns cloudy, and the wall is then left to dry completely, often for a full day or longer, with consistent airflow.
Only after this drying period do they consider applying a breathable anti-mould primer or mineral paint. There is no rush to make the wall look flawless within hours. This patience matters because mould thrives where moisture is trapped. Strong chemicals may whiten a surface quickly, but they can seal damp beneath the paint and encourage it to return.
Everyday Habits That Help Stop Damp From Coming Back
Many painters agree that daily routines are responsible for a large portion of damp issues. Lingering steam after showers, furniture placed flush against cold walls, and drying laundry indoors all increase moisture in the air. The prevention routine they suggest is simple, yet highly effective.

Brief but thorough ventilation twice a day helps reset indoor humidity. Leaving a small gap between furniture and exterior walls allows air to circulate. Using extractor fans while showering or cooking prevents moisture from spreading through the home. These small changes reduce humidity just enough to make conditions uncomfortable for mould growth.
Professionals also caution against painting over damp areas with standard acrylic or glossy finishes. While the wall may appear clean at first, stains often re-emerge as moisture forces its way back through the paint. As one seasoned painter explains, “Walls need to breathe.” When moisture is trapped beneath the surface, blistering becomes unavoidable.
- Leave space between large furniture and exterior walls.
- Ventilate briefly but thoroughly, especially during winter.
- Keep indoor humidity between 40% and 60%.
- Clean light mould using diluted vinegar, not harsh chemicals.
- Investigate recurring damp for possible leaks or insulation problems.
At its core, the message is simple: when indoor air stays damp, walls will reflect it. When cleaning is combined with better airflow and breathable finishes, mould struggles to return.
Living More Comfortably With Healthier Walls
Viewing damp as a relationship between air, daily habits, and building materials completely changes the response. Instead of reaching for the strongest-smelling product, attention shifts to quieter questions about where moisture originates and how long it lingers.
Sometimes, a small adjustment is enough to stop mould from reappearing. In other cases, professional inspection uncovers a hidden leak or insulation flaw. The principle remains unchanged: avoid fighting visible symptoms with aggressive chemicals while the underlying cause remains.
The painter’s approach may feel slow in a world that expects instant results, but it respects both the structure of the home and the people living inside it. By observing carefully, drying thoroughly, cleaning gently, and adjusting everyday routines, homes become more comfortable and far less likely to deliver unpleasant damp surprises.